20161023 – Car Camping Cooking Essentials, Part Two – Mess Kits, Utensils and Cleaning

coleman-mess-kit
Coleman 5 pc Mess Kit

Mess kits –  these can range widely from the super-duper, extra fancy and lightweight titanium nesting sets from a manufacturer like Snow Peak all the way to the super cheap plastic dinnerware sets. When we first started camping we bought most of our gear from Wal-mart, this was the most convenient and cheapest way to go and you can still find some really good deals there. The very first mess kit we bought was this 5 piece set from Coleman.  Super cheap and light I thought this was the perfect set but it unfortunately did not live up to our needs and we ended up using them as just plates and bowls and cooking in actual pots and pans we raided from the kitchen.

81wljcxgazl-_sl1500_
Coleman Max 4pc Set

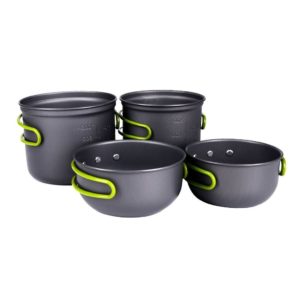
This led to us purchasing some Coleman enamelware to use as plates and dishes and while we found that they were very durable, they were too heavy and bulky,meant more for a backyard BBQ or picnic rather than camping, especially if we were going to do some backpacking. This led us back to the store to check out other lightweight options and we found the Coleman Max anodized cook set. This set was similar to other much more expensive sets but at the Coleman price point it was perfect for us. Unfortunately for you they no longer carry this model and they did not make a replacement but there are several off-brand types available on Amazon like this very similar set here.

51ngx-tm0xl-_sl1024_
Nesting Cookware Set

For a single person or couple this is the perfect setup for heating and cooking individual meals. That is unless you are a real camp cook gourmet, then you’ll need to have your Lodge Cast Iron set! I’ve seen my niece cook some AMAZING things in her cast iron pots and pans and there is no better smell in the world than bacon cooking on a cast iron pan in the morning!

If you are looking for something a little nicer or you have a family this setup from Mountain Summit Gear is really nice and at a midrange budget the perfect set if you plan on doing a lot of camping. We still use the Coleman Max set as our personal cups and bowls but we have gotten very simple and eating dehydrated food that only requires boiling a cup of water and so we have reduced the need for cookware. If this is your first time camping you could always steal a pot from the kitchen and bring some plastic utensils and paper plates, it can be that simple! But, if you plan on camping with any regularity you should invest in a simple cookware and utensil set. This is better overall for the environment and gives you flexibility in your food prep as well.

41sbvum3igl
Cheap IKEA set


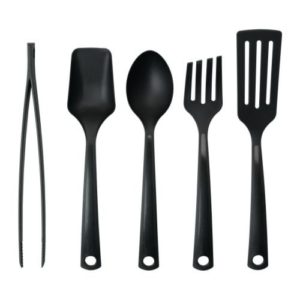
Utensils – If you are my wife this section is totally useless, no matter what nifty tool I get or light, flexible, foldable, indestructible utensil I find, my wife uses a pair of disposable chopsticks to cook, eat and prep food. She believes that all of her ancestors have cooked outdoors using nothing but chopsticks so that’s all she needs about 99% of the time. The other 1% she begrudgingly uses a couple of inexpensive .$99 store nylon tools that for the most part work okay and you won’t feel bad if they melt, break or walk away.

51v3ilfvpsl-_sl1024_
Metal tongs work the best!

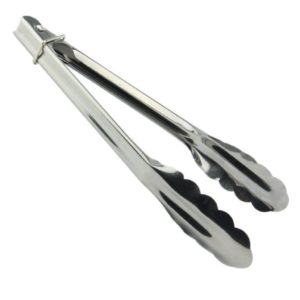
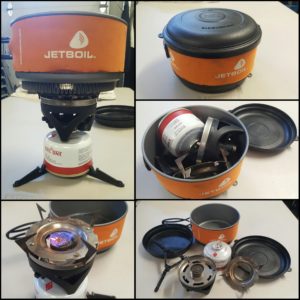
One item that I have found is really useful is a cheap pair of metal tongs. Metal and not plastic or nylon as those tend to bend and flex too much. Again, you don’t need to spend much on them as they will break or get lost sooner or later. I have been thinking about replacing our current set of tools with these from JetBoil since they break down to fit into the pot and they are relatively inexpensive. On the other hand, my wife has a point about the chopsticks… once you are done with them you can just throw them into the fire!

06e8f59a-4c94-4865-a194-a414fab2551f
JetBoil Cooking Utensils
51bydqxqxnl-_sl1000_
ceramic paring knife with cover

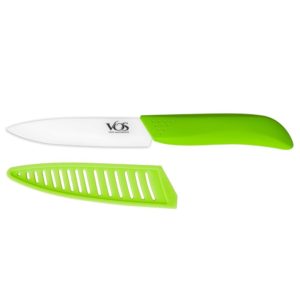
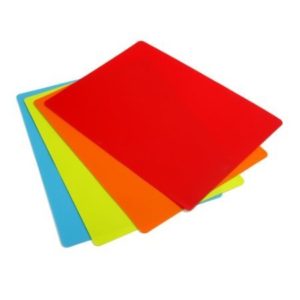
The last two items really make campsite cooking easier as well. We’ve been using a small ceramic cooking knife with cover and flexible cutting boards and they work out great. From cutting up fruit and vegetables to slicing cheese or a nice steak, having a nice sharp blade is very useful and the cover keeps the blade clean and safely stored. The cutting boards are great for throwing down on a nasty old picnic table to keep your food prep area relatively sanitary. We’ve found these two items really useful in general.

Flexible cutting boards

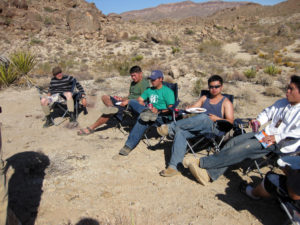
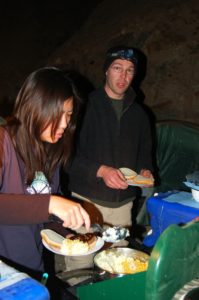
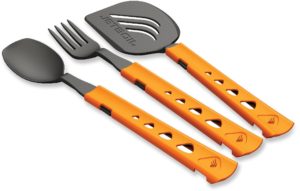
Now that we have covered cooking utensils you’ll also want something to eat with. Again, according to my wife you would just eat with the chopsticks that you cooked with… and she does have a point. But once in awhile you’ll need something more than a pair of sticks. When we first started camping I bought a pair of military style fork, spoon and knife sets in the center picture. These worked great and we still have them in our kit but they are little big and bulky so when we went backpacking we upgraded to the nylon fork and spoon combo at the bottom. These combo utensils are light and nearly indestructible but they come up a little short when you are trying to dig out the last bites of that Mountain House bag! Later on we ended up getting a couple of titanium utensils when they were on sale. Super light and super strong but also not cheap. In the end, for car camping or new campers, grabbing a set of the military or nylon combos are great. If this is your first trip, go with a set of plastic and wash them after your meal!

photogrid_1477030574959
(top) titanium spork (middle) military mess kit (bottom) nylon combo

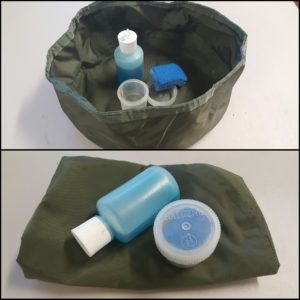
Cleaning – This of course is everyone’s favorite part of camping! This can really be a chore, especially at a campsite with no running water but we have found that cleaning up pots and dishes are a lot easier with this simple folding camp sink. Ours is an old military style collapsible wash basin and are harder to find. The newer styles are a little better at holding up after they are filled but ours is super light and small once folded up. Along with the wash basin is a simple squeeze bottle of dishwash soap and a Scotchbrite Blue sponge that I cut into quarters and stuff into a Nalgene container to keep it clean and from getting other stuff wet.

photogrid_1477030084257
Our dishwashing setup

Some like to use rubbermaid containers, plastic shoeboxes, all the way up to this contraption here. Whatever you use just remember to get rid of your dirty dishwater away from your campsite and disperse the water so the scent is not concentrated in one area and well away from any water sources. Soaps and detergents can be harmful to aquatic life and the scent can and will attract rodents and even larger animals like coyotes to your campsite so keeping clean and following “Tread Lightly” principles are important.

What? You don’t know what Tread Lightly means? Well, check out this site for more information and look for a future blog post on the subject.  Thanks for reading and remember to find your adventure where ever you may wander!

Follow us on instagram @adventurenotincluded or for more photos, check out our Flickr account here.


20161020 – Car Camping Cooking Essentials, Part One – Campstoves

71gu2srxzol-_sl1500_
Coleman propane camp stove

Campstoves  –  If you’re gonna cook while camping (yes that is a choice as there are some that adhere to a no-cook camping lifestyle) you’re gonna need something to cook with and the choices are plentiful. There are some who stick with the tailgater style propane grills, the old-school Coleman propane stove, butane canister stoves, isobutane stoves, integrated stoves and the liquid fuel bottle stove. Since we are talking about car camping here I’m gonna stick with the most popular ones. First up is the OG camping stove, the Coleman propane stove. We used one for years and then gave it away and got another one and gave that one away too, each time thinking that we have graduated from the classic propane stove. But it’s a classic for a reason, easy to use, inexpensive and  readily available fuel and great cold weather performance makes this a great stove for any car camper.

41cwpjlrggl
Portable butane stove

One option that we have seen and we have tried it ourselves is the butane stove. Most of our Asian friends out there will be familiar with this type of single burner butane stove (hot pot or Korean BBQ anyone??). It burns very efficiently and provides great heat, it’s light and inexpensive but the canisters are not as readily found and it suffers in altitude or colder climates.  This is our current option when we go group camping and need to prepare or heat up larger amounts of food. It doesn’t take up as much space as the Coleman and the burner seems to work better for simmering and keeping food warm.

primus-gravity
Primus Gravity camping stove

For us, we find that the big propane stove is often overkill since many times there is only the two of  us and we have simplified our camp cooking to a lot of dehydrated meals which only require boiling water. So we first started with a Primus Gravity (discontinued) backpacking stove that uses blended isobutane and propane fuel canisters. This worked great on our first couple of trips and the low and wide style of the stove is very stable and because of the huge burner this is a great stove for larger pots and pans. The remote canister style stove also allows for a windscreen to be used in windy conditions. This stove is still used in our kit for cooking and heating up food and is perfect for small groups. We have noticed that the built-in starter does not always work and boiling water at higher altitudes or in very cold weather takes a long time, so this motivated us to try another type of stove…

jetboil-gcs
JetBoil Group Camping System

Integrated stoves like the JetBoil have gained popularity for its ease of use and its ability to very quickly and efficiently bring water to a boil. These are great at what they are designed for but most of these systems are not designed for cooking or heating up food. After researching a bit we decided on the JetBoil Group Cooking System, which is no longer being made. This system uses a 1.5L pot with a finned bottom that concentrates the heat into the pot. This works fairly well and you can boil a large pot of water in less than 5 minutes. This system also allows you to heat up a pot of stew or cook pasta which makes it very versatile. However, the drawbacks of this system are much like all of the blended fuel stoves in that they suffer in the high altitude and very cold weather. Plus the tall design of the stove is a little unstable and windscreen use is somewhat risky as there is a danger of overheating the canister. But overall we like this stove and it almost always travels with us.

If you are really camping in high altitudes or very cold conditions then a liquid fuel stove is the way to go but those stoves are not as easy to use, as they require priming before each use. They are also prone to leakage and spills if not closed properly and we have heard a number of stories of near tragedy due to fuel spills or leakage. Because of the style camping we do and my personal preference for ease of use, we have stayed away from the liquid fuel stoves although I can see its value in its versatility and flexibility and in the future we may have to give one a try.

Fuel canister types

Ultimately you must choose your stove based on your personal preferences and circumstances but for car camping you really can’t go wrong with a propane camp stove like the Coleman mentioned earlier. If you really want to step it up though, the Camp Chef Everest stove is very highly rated. At a steep $120 for full retail it is about twice the cost of the Coleman but with two 20,000 BTU rated burners and all stainless steel construction, you’ll be passing this stove along to your grandchildren and it’ll still be a solid choice for a car camping stove!

Camp Chef Everest 2
Camp Chef Everest 2


That’s it for Part One, next time we’ll cover Mess Kits, Utensils and Cleaning. Thanks for reading and remember to find your adventure where ever you may wander!

Follow us on instagram @adventurenotincluded or for more photos, check out our Flickr account here.


20161018 – Five Car Camping Essentials

Planning a multi-day backpacking trip can be daunting, deciding what to bring and what to leave behind for space and weight savings can be agonizing. Many times through trial and error you learn what works and what doesn’t and you begin to carefully craft your packing list. Car camping is much more forgiving. Items that are too heavy for backpacking can now be brought along. Items sacrificed due to weight and space can help bring a little more comfort to your campsite. This post is to cover some of the very basic items that you will need. If you are just looking for a comprehensive list, check here at REI.com…

dsc_0059
Assorted styles from backpacker to family

#1 – Tent  For years we used a three man Coleman tent we bought at Wal-Mart, much like this one here. This little tent served our car camping needs for many years until we wanted to go backpacking and we upgraded to the REI Half Dome tent similar to this one. Lightweight and small, the Half Dome served as our shelter for many trips until recently when we purchased a rooftop tent from Front Runner Outfitters which now serves as the official *Adventure Not Included basecamp. If you keep your eyes out for sales you can pick up a good tent for car camping for less than $40, for example this one from Big 5 Sports on sale for $30 until this weekend. Keep in mind that these inexpensive tents are not good in inclement weather, in fact few but the very best made tents will stand up to heavy rain or hard winds but unless you want to drop $500-600 on a tent from Northface or Mountain Hardwear, retreating to a local rooming establishment is your best option. Trust us when we say, sleeping in a 3 season tent in gale force winds or below freezing temperatures is not much fun and there is no shame in staying at a nearby motel for the night. Sleeping in your car is always an option but it is not very comfortable. Since our Half Dome tent has gone MIA, our personal choice for our next tent is most likely the REI Passage for the light weight, double doors, ease of setup and good reviews.

mojave-wander-029
Front Runner Outfitters rooftop tent
ec1ce820-e007-47a3-8908-359d38e36d77
ALPS Mountaineering mummy bag

#2 – Sleeping bag and #3 – Sleeping Pad  There are many choices here but the best and warmest option we have found is a good fitting mummy bag. The fit is important because if the bag is too tight you will be uncomfortable and if it is too big you’ll have a hard time staying warm. If you are backpacking, finding the perfect balance between weight and warmth is important. Car camping however is much more forgiving and I would place a greater emphasis on warmth. You can always open up the bag to vent some warm air but you’ll never be able to generate more heat from a light bag. Personally we use ALPS Mountaineering mummy bags that are rated to about 30 degrees. We got them from the REI outlet for about $80 each and they have been great for us. We have slept in colder temperatures with these but we would not recommended to use them below about 40 degrees without an additional liner or blanket. If you never plan on sleeping out in the cold there is nothing wrong with the classic style sleeping bag from Wal-Mart that you can pick up for about $25.

One of the essential items that go along with the sleeping bag is a sleeping pad. We currently use the Therm-A-Rest 3/4 length pads which are self-inflating pads that are intentionally short to save space and weight. These three quarter style pads only provide cushioning for the upper body and hips and work very well for our older frames when sleeping on the ground. Sleeping pads accomplish two things, providing a little padding and insulating you from the cold ground which can quickly sap the warmth from your body. Some people might prefer an air mattress but they don’t always fit inside the tent and they are prone to leakage. If you go this route, make sure that the mattress fits inside your tent before you take it out for the first time.


daves-bachtrip-0124
Camp chairs make camp life better!

#4 – Camp Chair  Although some might think this is not an essential item, this can make a huge difference in making your camping trip a more comfortable experience. It never fails that someone is ALWAYS sitting in my camp chair around the fire at the end of the day because they didn’t bring their own. The uses are not limited to camping either, we use ours at the park, tailgates, backyard and even the garage. Although they make a lot of different styles, you just can’t beat the basic collapsing camp chair. Outdoor Gear Labs even did some testing on several different types of camp chairs and this ALPS Mountaineering model was the winner. But at $60 can you really see much difference in the $7 Ozark Trail model? Yes, the ALPS model looks heavier and the max capacity of the chair is 800lbs compared to the 225lb weight limit of the Ozark model but it also weighs 13lbs compared to the less than 5lb weight of the Wal-Mart chair. I’m sure that the ALPS model will last quite a long time but I can’t see dropping that much coin on a camp chair that’s ultimately gonna get used and abused. The Ozark Trail chairs aren’t the most durable things in the world but ours have lasted through many desert camping trips and beat sitting on a rock!

253303_28210_l2
ALPS Mountaineering camp chair
915236dc-22a6-4ddc-b62c-1110ddc79c66_1-6ad4633a54d57707474826efe53f0ab7
Ozark Trail camp chair
dsc_0198_dinnerbyheadlamp
Dinner by headlamp

#5 – Headlamp  Another indispensable item that every camper should have, headlamps will make your life easier. Imagine this scenario… it’s late at night, you were fast asleep in your tent but now… nature is calling and you can’t ignore it any longer. Okay, look for your flashlight… where is it?!? Oh, okay it rolled over to the other side of the tent… okay, open the zipper and try to get your shoes on, all while fumbling with the flashlight. Switching hands, under your arm, pinched at your neck… wow, this would be nicer if I had BOTH hands free! OK, so do I need to continue?? The LED headlamp is a great innovation in camping technology that everyone should be using. Hands-free, lightweight, bright easy to direct beam and can be found for a low cost. This really is an essential item and these Black Diamond models are really great value and are highly recommended by many hikers and campers.

Personally, we use the Enduro model from Streamlight because I’m a Streamlight fanboy and own a couple of lamps from them. Powered with two AAA batteries and providing 6 hours of continuous light on high, durable, powerful and light. we’ve had these headlamps for a few years now and I use them all the time around the house, on the car and in the backyard, anywhere I need a hands-free light. Not to mention that it makes answering the call of nature in the middle of the night SO much easier without fumbling around with a flashlight!

20161018_223516
Streamlight Enduro headlamp


So that’s it, those are the first five essential items to have to go car camping. That wasn’t so bad was it?? Next time we’ll cover some essentials for one of the most important parts of camping…  COOKING!  Thanks for reading and remember to find your adventure where ever you may wander!

Follow us on instagram @adventurenotincluded or for more photos, check out our Flickr account here.